
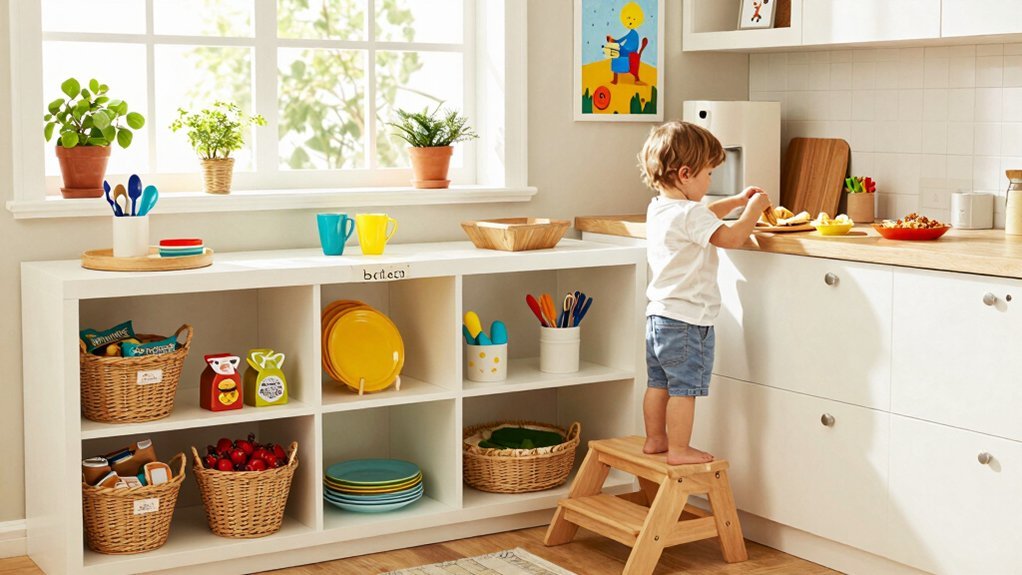
Start with a quick safety sweep: lock knives, store cleaners high, and clear countertops. Designate low, labeled drawers and a sturdy step stool so kids can reach plates, utensils, and snacks safely. Declutter cabinets using a keep‑or‑donate system, keeping only essential appliances within arm’s reach. Set up a kid‑friendly snack and water station on a low cart, and label everything with pictures. Establish a daily game‑based put‑away routine and weekly safety checks, and you’ll discover even more tips ahead.
Start With a Quick Kitchen Safety Check

Usually, you’ll start with a quick safety sweep: remove knives, bleach, and any sharp or toxic items from kids’ reach, store frequently used tools in low drawers or cabinets, and clear the counters of nonessential clutter. Next, assess your storage system. Pull every utensil, pot, and appliance into view, then decide which belong on the low shelves where a child can grab them safely. Heavy or breakable items should go into higher cabinets with child‑proof locks, while everyday dishes and snacks stay in the easy‑access drawers you’ve designated. Label each drawer with simple pictures or words so kids know where to return items, cutting down on frantic runs toward hot stoves. Finally, keep the worktop clear, leaving only the tools you want them to use, and you’ll have a safe, organized space that encourages independence. Incorporating low shelves at child height helps promote autonomy and accessibility in kitchen organization.
Define Kid‑Friendly Kitchen Zones & Set Safety Boundaries
You’ll designate low drawers for plates, cups and utensils, so kids can grab what they need without stretching. A sturdy step stool or low chair gives them safe, easy access to those zones while keeping them off counters. Then, clearly mark the “no‑go” area around hot surfaces and heavy appliances, teaching them to stay out of those hazard‑free zones. Consider investing in a step stool with four-sided safety railings to further minimize fall risks during kitchen activities.
Low Designate Low Drawers
Where should the kid‑friendly zones start? Begin with two cleared drawers at a height Rory can reach. Remove non‑essentials and worn‑out pieces, then place Home Edit bins that match the drawer depth so tall bins don’t block the opening. Tape a printed photo under each bin, labeling the contents to cue where items belong. Keep only the frequently used kid items—spoons, snack containers, small plates—in these low drawers; store rare or fragile items in higher cabinets. Lock or relocate sharp tools and hazardous equipment to upper spaces, establishing clear safety boundaries. This kitchen organization lets Rory grab what he needs independently while protecting him from danger. Consider including child-safe dishes with spill prevention technology to minimize messes during mealtime.
Install Secure Step Stools
How can you make the kitchen both accessible and safe for Rory? Choose a durable, non‑slip step stool—teak works well—and keep it where he can reach it without climbing on unsafe surfaces. Position the stool in front of the sink, the countertop, and the kitchen cabinet lower shelves so he can pull out dishes or snacks independently. Look for a stable base, rounded edges, and a wide platform that won’t tip.
Compare traditional stools, learning towers, or height‑appropriate chairs to fit your space and long‑term needs. Set clear rules: no stepping on counters, adult supervision for knives, and use visual markers to define kid‑friendly zones. Consistently enforce these boundaries, and Rory will navigate the kitchen confidently and safely. Incorporate child-safe knives and cutting boards made from non-toxic materials to allow safe, supervised food preparation.
Mark Hazard-Free Zones
A sturdy step stool gives Rory a safe launchpad, and now you can turn that reach into a structured, hazard‑free kitchen. Start by designating kid‑friendly zones: lower drawers hold cups, plates, and utensils, while knives and cleaners stay on high shelves or locked cabinets. Attach clear visual cues—photos or icons—under each bin so he knows where items belong and can return them safely. Set a dedicated water‑snack station and a low work surface to eliminate climbing for high shelves. Install a “kid/baby stuff” cabinet that isolates children’s items from adult supplies, keeping clutter low and access limited. Review the zones regularly, adjusting heights and contents as Rory grows, so every zone stays safe, organized, and appropriate for his abilities. For added learning and independence, incorporate materials with autonomous error correction features to help develop Rory’s problem-solving skills within his environment.
Declutter Cabinets: Keep‑or‑Donate System
Ever thought a quick keep‑or‑donate sweep could transform your kitchen? Start by emptying each cabinet, then sort items into three piles: keep, donate, discard. This kitchen organization habit gives kids a clear visual of what belongs where and teaches decision‑making.
A quick keep‑or‑donate sweep transforms kitchens, teaches kids decision‑making, and creates clear, organized spaces.
- Duplicates & broken pieces – Toss anything you have more than one of or that’s cracked; a single Pyrex set suffices, spare bowls go to donation.
- Kid vs. adult dishes – Separate colorful plates from formal china; store kid dishes on a low shelf to avoid wobble, keeping adultware on higher racks.
- Rarely used tools – If you haven’t used a gadget in six months, move it to the donate bin; keep only everyday tools within reach.
Spread items across appropriate cabinets instead of cramming them all into one, and prune pantry foods regularly. This structured, goal‑driven approach keeps the space tidy and invites kids to help.
Organize Small Appliances: Keep Only Essentials Within Reach

You’ll keep only the appliances you use weekly, so the kitchen stays tidy and functional. Place those essentials on low shelves or in labeled drawers within the child’s reach for safe, independent use. By removing duplicates and rarely used gadgets, you prevent clutter and make every tool easy to find. Consider incorporating child-safe tools designed for independent use to empower your child while ensuring safety.
Essential Appliances Only
Which small appliances truly belong on the kitchen counter? You want only the tools you reach every day, so kids can help without tripping over clutter. Keep the toaster for quick toast, a hand‑mixer for batter, and a Boon drying rack for dishes. Anything else—extra blenders, specialty gadgets, or bulky coffee makers—belongs in a higher cabinet or donated. By limiting the counter to essentials, you free up space, reduce temptation, and make clean‑up easier for independent children. Reassess weekly: if an item sits idle, move it out of reach. Store the three essentials in a labeled drawer or low cabinet for quick access and maintenance. Consider adding child-size aprons with adjustable straps and pockets to keep children safe and organized during kitchen tasks.
Strategic Placement Matters
After clearing the counter to just a toaster, hand‑mixer, and drying rack, the next step is to decide exactly where those few items live. Place the toaster and mixer on a low shelf or a pull‑out drawer that’s easy for kids to reach but out of the way of high‑traffic zones. Keep the drying rack on a nearby countertop edge, but tuck it under a cabinet when not in use. Use labeled bins for each appliance, grouping them by function so your child knows where to find the blender versus the hand‑mixer. This arrangement frees up space for kid‑friendly dishes and snacks, streamlining meal prep and supporting a smoother family life. Reassess the layout every few months to keep only the essentials within reach.
Limit Redundant Devices
Why keep a drawer of half‑used gadgets when a single, well‑chosen set can do the job? You’ll free space, cut confusion, and let your child focus on real tasks. Start by doing a keep‑or‑donate sweep: toss broken or rarely used appliances, then stash the rest out of sight. Keep only the essentials—like a toaster, a mixer, and a Boon drying rack for sippy cups—within easy reach. Store the rest in a dedicated “Kid Stuff” cabinet so your child can pull what they need without hunting.
- One toaster for quick toast
- One mixer for simple batter
- One drying rack for cups
Check weekly, adjust as ages change, and keep the kitchen lean.
Create a Kid‑Friendly Snack & Water Station

Ever wondered how a simple side table can turn snack time into a confidence‑building routine? Place a low, sturdy cart near the kitchen sink and load it with a small pitcher, reusable cups, and a Boon drying rack for sippy cups. Label each shelf with bright icons so kids can help set the table without guessing. Keep snack bags, fruit slices, and squeeze pouches in a clear bin at arm’s height; they’ll grab what they need and return empties themselves. Add a stack of napkins, tissues, and a towel for spills, all within reach. Rotate the offerings weekly to teach variety, and encourage your child to refill the water pitcher or replace a finished snack, reinforcing independence while minimizing mess.
Install Home‑Edit Child‑Sized Drawers and Bins
So, how do you turn ordinary kitchen drawers into a child‑friendly command center? First, you clear two drawers, tossing non‑essential items to make room for Rory’s supplies. Next, you select home edit bins that snugly fit the drawer dimensions and choose a height that lets a small child reach everything without stretching. Finally, you iterate the layout—tweaking placement until each compartment feels natural and easy to access.
- Pull out the drawers, empty them, and wipe them clean.
- Insert the home edit bins, aligning them so the front edges are level with the drawer face.
- Adjust the bins’ positions, testing with Rory’s hands until the setup feels effortless.
This creates a tidy, reachable zone that encourages independent snack prep and cleanup.
Label Bins With Photo Cues for Easy Return
You’ll snap a photo of each item, tape it under the bin, and give kids a clear visual cue for where everything belongs.
Those picture labels let them spot and return objects in a flash, turning clean‑up into a quick game.
The system cuts guessing, builds consistency, and makes independent kitchen use feel effortless.
Photo Cues for Quick Identification
How can a simple photo turn a chaotic kitchen into a child‑friendly system? You snap a picture of each bin’s contents, edit it for clarity, and print it on sturdy paper. Tape the image to the underside of the bin so your child gets an instant visual cue. This visual labeling cuts down rummaging, makes cleanup feel like a game, and teaches where items belong.
- Snap & Edit – Capture the exact items, crop distractions, add a bright border.
- Print & Attach – Use glossy cardstock, laminate for durability, and tape securely under the bin.
- Play & Return – Encourage your child to match the photo before closing the lid, reinforcing the habit.
The result is a quick‑glance system that turns everyday chores into a confident, independent routine.
Visual Labels for Easy Return
Ever wonder how a single picture can turn a messy kitchen into a tidy, child‑friendly zone? You can create visual labels by photographing each drawer’s contents, editing the images, and printing them on sturdy paper. Tape the pictures to the underside of each bin, turning every storage spot into a clear visual cue. When a snack or utensil lands in the wrong place, your child simply glances at the label and knows where it belongs, turning cleanup into a game. The system also lets a parent or older sibling act as a helper, reinforcing consistent tidying habits. By eliminating guesswork, visual labels cut clutter and speed up return, making independent kitchen use effortless.
Teach Kids to Return Items Using Visual Labels
Ever wondered how a simple picture can turn tidying up into a game? You can turn every drawer into a visual cue that guides your child to return items without a lecture. First, snap a photo of each compartment with its proper contents. Then print, laminate, and tape the image to the underside of the bin so the label is visible when the bin is lifted. Finally, keep the pictures up‑to‑date whenever you reshuffle supplies.
- Capture – photograph the organized space.
- Print & Attach – create clear visual labels for each bin.
- Refresh – replace photos when items change.
Set Up a Stable Step Stool or Learning Tower
A sturdy step stool or learning tower gives your child safe, independent access to the countertop while keeping you free from constant supervision. Choose a model that balances durability and comfort—teak options are praised for longevity and stability. Compare a regular step stool, a learning tower, and a hybrid model by space usage, long‑term fit, and safety concerns like gaps or slippery finishes. Guarantee the height lets your child reach the counter without on‑tip risks or stretching, and pick a non‑slip base that can grow with them from toddler to older child.
| Feature | Step Stool | Learning Tower |
|---|---|---|
| Space | Compact | Larger footprint |
| Height | Fixed | Adjustable |
| Safety | Simple base | Enclosed sides |
| Cost | Lower | Similar to specialized stools |
Arrange Kid‑Specific Utensils, Plates, and Cups
Where can you make meals easier for your child? By carving out a kid‑friendly kitchen zone that’s within arm’s reach. Store a dedicated lower drawer or cabinet with child‑sized utensils, plates, and cups, and keep everything in the same spot every day. Use labeled bins or baskets so your kid can see where each item belongs and return them without guessing.
- Choose a bright, low drawer for forks, spoons, and child utensils.
- Place a row of sturdy, kid‑sized plates and cups on a shelf that’s easy to pull out.
- Add a small pitcher or water bottle beside the drawer for self‑service.
Consistently pairing these items with a simple set‑the‑table routine builds independence and cuts search time.
Establish a Daily Game‑Based Put‑Away Routine
After setting up your kid‑friendly zone, turn the end‑of‑meal cleanup into a quick, fun game. Establish a daily Put-away game by using clearly labeled drawers and photo cues that match each child‑size item. Set a five‑minute timer so the challenge feels urgent but manageable, and let your child retrieve only the items stored at their height. Use Home Edit‑inspired bins and visual markers to keep the process simple; when the timer dings, tally successes—like all cups back in their drawer—and celebrate with a high‑five or a sticker. Consistent, short bursts reinforce a predictable rhythm, turning cleanup into a habit rather than a chore while boosting independence and confidence.
Maintain the Kitchen: Weekly Clutter & Safety Checks
Ever wonder how a quick 15‑minute weekly sweep can keep your kitchen safe and tidy for your kids? Set a timer and treat the session like a family check‑in. You’ll spot outdated snacks, broken tools, and hidden hazards before they become problems.
- Cabinets & pantry – Pull out every item, toss expired food, and group like‑items in clear jars.
- Junk drawer – Remove duplicates, discard broken gadgets, and keep only essentials in a labeled section.
- Safety spots – Verify knives, cleaners, and small appliances sit in locked or high cabinets, out of reach.
After you finish, note what your kids used most and tweak storage for the next week. This routine keeps the kitchen organized, reduces clutter drift, and reinforces a safe, independent environment for the whole family.
Frequently Asked Questions
How Can I Involve Children in Grocery Shopping and Pantry Stocking?
You can let kids pick a list item, scan barcodes with a phone, and help weigh produce. Assign simple stocking tasks—like placing snacks on lower shelves—so they feel useful and learn responsibility.
What Age Is Appropriate for Kids to Use a Dishwasher Safely?
Kids can start using a dishwasher safely around eight or nine, once they understand loading, unloading, and avoiding hot water. Supervise until they consistently follow safety steps, then let them handle it independently.
How Do I Keep Spices and Seasonings Child‑Proof yet Accessible?
Store spices in high, lockable cabinets, then place a child‑proof latch on the lower shelf you use. Keep frequently‑used herbs in a magnetic strip on the fridge, within your reach but out of kids’ sight.
Can I Teach Kids to Help With Meal Planning and Recipe Selection?
Yes, involve them in weekly menus, let them pick one new recipe, guide them through grocery lists, and let them choose ingredients. This builds confidence, teaches nutrition, and makes planning a fun family habit.
What’s the Best Way to Store and Label Reusable Snack Bags for Kids?
Store reusable snack bags in a clear bin, group by size, then label each compartment with a durable, waterproof sticker showing the snack type. Keep the bin at kid‑height for easy access.




Leave a Reply