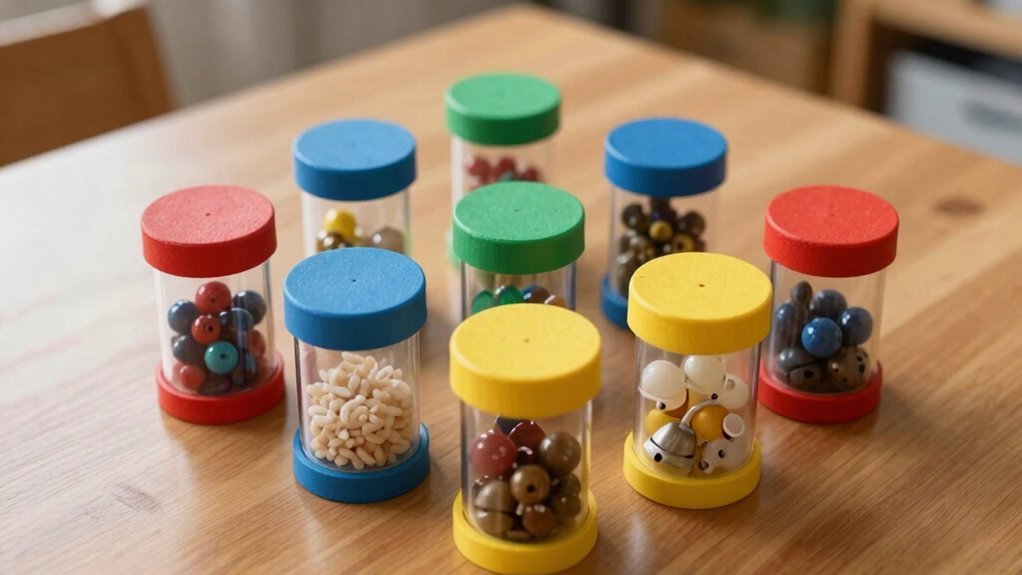
You can make ten DIY sound cylinders using sturdy jars or plastic tubes, seal them tightly with glue, and fill each pair with identical amounts of granular fillers like rice, beads, pennies, or rocks to create distinct soft‑to‑loud tones. Color‑code or sticker each pair for quick visual matching, then run a three‑period Montessori lesson: introduce loud vs. soft, compare two cylinders, and order all from loudest to softest. Blindfolding sharpens auditory focus, and troubleshooting tips keep sounds consistent. Keep going to discover more detailed steps and variations.
Select Containers for DIY Sound Cylinders

What containers should you choose for DIY sound cylinders? You’ll want at least six identical containers—twelve if you plan three to six distinct sound pairs. Pick sturdy, airtight jars or plastic tubes that seal tightly, then secure the lids with strong adhesive or hot glue to keep leaks out and acoustics stable. Use the same material and quantity in each member of a pair so the sound matches perfectly. Mark each pair with a unique color, symbol, or sticker; this visual cue speeds self‑correction and ensures correct pairing during play. Opt for containers that feel comfortable in small hands and can withstand repeated tapping. Consistent size, shape, and sealing give you reliable, repeatable sound output for every learning session. For durability and safety in early childhood learning tools, consider using materials such as Bavarian beech wood which are noted for their high quality and longevity.
Choose Fillers That Make Different Sounds
Pick granular fillers—like rice, breadcrumbs, beads, pasta, pennies, or rocks—to create clearly distinct sounds for each cylinder. Keep the containers identical and fill them with the same amount so the paired cylinders echo each other when shaken. Label each pair with a unique color or symbol, seal the lids securely, and test the tones before you start the matching game. Ensuring the materials used are safe and non-toxic helps maintain proper material quality and safety standards.
Granular Fillers for Distinct Sounds
Ever wondered how a simple shake can become a powerful learning tool? When you pick granular fillers, you tap into sensorial materials that sharpen auditory discrimination. Choose four distinct textures: the softest (sand or rice), soft (small beads or pasta), medium (pennies), and loudest (marbles or rocks). Fill two identical cylinders with equal amounts of each filler, seal the lids with glue or tape, and shake near the ear to confirm the sounds match before labeling the pair. Color‑code or symbol‑mark each set for quick visual reference and self‑correction during play.
- Sand or rice – whisper‑like rustle
- Small beads or pasta – muted clink
- Pennies – crisp metallic tap
- Marbles or rocks – resonant thud
For enhanced sensory learning, incorporating self-correcting control error techniques similar to Montessori materials can help children independently refine their auditory discrimination skills.
DIY Fillers for Auditory Variety
When you select fillers, aim for materials that produce clearly different timbres—soft grains like sand or rice for a whisper‑like rustle, small beads or pasta for a muted clink, pennies for a crisp metallic tap, and marbles or rocks for a resonant thud.
In a Montessori‑style setup, keep each cylinder identical in size and label, then fill both halves of a pair with the same quantity of a chosen filler. Test the sound, adjust the amount until the auditory cue is distinct but consistent across the pair.
For younger learners, use transparent jars so they can see the filler; for older kids, blindfolds sharpen focus on the sound alone. Color‑code or tag each cylinder to enable self‑correction and easy error tracking during matching activities.
To maintain cleanliness and extend usability, consider materials that are washable and reusable, similar to practical dusting tools.
Seal DIY Sound Cylinders Securely

How can you keep your DIY sound cylinders from spilling or coming apart during play? You’ll want a reliable, DIY Montessori approach that guarantees secure sealing while preserving the auditory experience. Start by filling each container, then test the pair by shaking to confirm identical sounds. Once you’re satisfied, apply a strong adhesive—Fevicol or hot glue—to the lid edges, pressing firmly until the bond sets. Reinforce the closure with tape or a dab of glue if the plastic is thin, especially for younger users. Finally, label or color‑code each cylinder with a marker or sticker, keeping the lids firmly attached and making self‑correction easy. Ensuring smooth finishes and durable design helps maintain safety and longevity during frequent hands-on use, an important aspect emphasized in safety standards and certifications.
Introduce DIY Sound Cylinders With a Three‑Period Lesson
You’ll start with a quick Three‑Period Lesson overview, showing how the child first identifies loud versus soft sounds.
Then you’ll set up a loud‑soft contrast activity, letting them feel the difference before moving to blindfolded auditory matching.
This progression builds confidence and sharpens auditory discrimination.
Incorporating tools with Montessori educational guides can further enhance structured learning and independent correction.
Three‑Period Lesson Overview
Although the three‑period lesson may sound complex, it’s simply a step‑by‑step way to teach your child to tell loud and soft sounds apart using the DIY sound cylinders. You’ll start by presenting a single Sound, letting the child hear each Sound and name it “loud” or “soft.” Then you introduce a second cylinder, compare the two, and ask guiding questions that reinforce the Three Period Lesson. Finally, the child orders all cylinders from loudest to softest, cementing AuditoryDiscrimination skills and left‑to‑right sequencing.
- Phase 1 – single cylinder, identify loud vs soft.
- Phase 2 – two cylinders, compare contrast contrast.
- Phase 3 – grade and sequence all cylinders.
- Review vocabulary and self‑correct.
Using hands-on learning engagement techniques similar to those found in Montessori materials helps reinforce sensory discrimination effectively.
Loud‑Soft Contrast
Ever wondered how a simple shake can teach a child to tell loud from soft? You start with one cylinder, shaking it close to the ear while you say, “This is loud.” Then you repeat with a softer shake, labeling it “soft.” The child hears the contrast and learns the loud‑soft vocabulary.
In the second period, you ask, “Which one is louder?” and let the child point to the appropriate cylinder.
Finally, you let the child arrange several cylinders from loudest to softest, reinforcing grading. This three‑period sequence mirrors Montessori sensorial practice, giving clear, repeatable steps.
Blindfolded Auditory Matching
How can you sharpen a child’s listening skills when sight is out of the picture? Blindfolded listening forces sensory isolation, turning the ears into the sole source of information. You’ll use the three‑period lesson: identify loud versus soft, demonstrate with questions, then elicit answers. This structure sharpens auditory discrimination and builds confidence.
- Set the stage – Choose a quiet room, secure lids on each cylinder, and explain the task before placing the blindfold.
- Period 1: Identify – Play a single cylinder, ask the child to describe volume and timbre.
- Period 2: Demonstrate – Present two cylinders, prompt “Which is louder?” while they stay blindfolded.
- Period 3: Elicit – Remove the blindfold gradually, encouraging the child to match sounds using memory alone.
Match Red and Blue DIY Sound Cylinders by Sound
Can you hear the difference? You’ll set the blue cylinders on the right, the red ones on the left, and place a matched pair in the center for immediate feedback. When a child shakes a blue cylinder, you ask them to locate the red cylinder that makes the exact same sound. Using identical fillers and quantities guarantees that the auditory cue, not volume or texture, drives the red. Bottom codes or tiny markings help the child self‑correct: a matching pair reveals the same code, a mismatch shows different symbols. This sound discrimination exercise strengthens auditory memory while reinforcing the red blue matching concept. You can extend the activity with a Three Period Lesson, asking the child to label loud versus soft sounds, deepening the Montessori cylinders experience.
Blindfold the Child for Pure Auditory Focus

When you blindfold the child, you isolate the auditory sense and cut out visual distractions, sharpening their ability to discriminate pitch, volume, and timbre. This focused listening encourages independent exploration of each cylinder’s unique sound.
As their confidence grows, you can gradually ease the blindfold to transition back to partial visual cues.
Isolate Auditory Sense
Ever tried sharpening a child’s listening skills by removing sight altogether? You’ll notice a rapid boost in sensorial focus when you blindfold the child for pure auditory tasks. The lack of visual cues forces the brain to rely on sound, sharpening auditory discrimination and making blindfolded matching more effective. Use securely sealed, identical containers filled with distinct materials so each tone stands out. Introduce the blindfold gradually after a few non‑blind pairings to build confidence and keep frustration low. Keep a close eye on comfort and safety; stop immediately if the blindfold feels restrictive or interferes with breathing.
- Choose containers with clearly different fillers.
- Seal them tightly to avoid leaks.
- Start with eyes open, then add the blindfold.
- Monitor reactions and adjust as needed.
Enhance Sound Discrimination
After a few rounds of open‑eye matching, slip a soft blindfold over the child’s eyes and let the cylinders do the talking. The blindfold removes visual cues, forcing the child to rely on hearing alone, which sharpens sound discrimination. Start with a brief blindfolded session after the child’s comfortable with open‑eye play, then gradually extend the time as confidence grows.
Secure the cylinder lids so they won’t pop open, and keep the blindfold easy to remove for safety. This focused listening aligns with Montessori materials’ principle of isolating a single sense to build auditory memory and error feedback. You’ll notice quicker identification, subtle pitch differences and a deeper appreciation for the nuanced sounds each cylinder holds.
Foster Independent Exploration
A few minutes of blindfolded play can instantly sharpen a child’s auditory focus, letting the sound cylinders speak for themselves. When you blindfold, you strip away visual cues, turning the activity into a pure auditory discrimination exercise. The child learns to differentiate volume, pitch, and tone, building a stronger sensorial map of sound. After a brief familiarization, introduce the blindfold for a short, timed session, keeping the area safe and the fabric breathable. Encourage the child to describe each sound verbally, reinforcing language links and fostering independent exploration.
- Choose a comfortable, breathable blindfold.
- Start with labeled cylinders for orientation.
- Blindfold for 2‑3 minutes, then rotate matches.
- Prompt the child to name qualities: loud, soft, smooth, rough.
Scale Up to a Full Six‑Pair DIY Sound Cylinder Set
How can you expand a three‑pair sound‑cylinder activity into a full six‑pair set? Start by gathering twelve identical containers and filling each pair with the same material—rice, pasta, beans, marbles, etc.—in equal amounts. Label each pair with a distinct color or symbol, then arrange the lids so blue sits on the left and red on the right. Use a control‑of‑error code at the bottom of each cylinder to keep track. Present the set in three steps: listen to a single pair, compare several pairs from loudest to softest, and finally order all six pairs by intensity. This structured play boosts self‑correction and sequencing within sensory learning.
| Pair | Filler | Volume |
|---|---|---|
| 1 | Rice | 30 ml |
| 2 | Pasta | 30 ml |
| 3 | Beans | 30 ml |
| 4 | Marbles | 30 ml |
Troubleshoot Unequal Sounds and Slippage
Why do some cylinders sound louder or quieter than their twins? You’ll notice unequal sounds when fillers differ or lids shift. First, verify each pair uses the same filler type and amount, then shake both cylinders at ear level to compare tones. If slippage occurs, seal lids tightly with glue or tape and place cylinders on a stable, level mat. Use snug, non‑slip containers or add a thin foam ring between lid and body to curb movement. Finally, calibrate each pair by adjusting filler quantities until volume and pitch match perfectly. Keep a simple pairing key—color or symbol—so caregivers can reproduce identical‑sound pairs and quickly fix mismatches.
- Check filler consistency
- Secure lids and level the mat
- Add foam gasket for anti‑slip
- Perform calibration by ear‑shaking
Add Language Labels and Coding to DIY Sound Cylinders
Color‑coded stickers and printed words turn each cylinder pair into a visual cue for loud, soft, or middle sounds, helping you link language to auditory cues. You’ll attach a bright “loud” label to the marble cylinder, a calm “soft” tag to the rice one, and a neutral “middle” badge to the beans. Pair each sticker with a matching card that names the sound quality, then use the Three Period Lesson to have the child identify, demonstrate, and name the level. As proficiency grows, fade the language labels, prompting pure auditory discrimination without visual prompts.
| Pair | Sticker | Card |
|---|---|---|
| 1 | loud | loud marble |
| 2 | soft | soft rice |
| 3 | middle | middle beans |
| 4 | loud | loud beads |
| 5 | soft | soft sand |
Create Year‑Round Variations for Ongoing Engagement
When you swap fillers—sand, rice, pasta, beads—and even the containers themselves, you keep the sound‑cylinder activity fresh all year long. Rotate the auditory palette to sharpen sound discrimination while maintaining year‑round variations that keep kids eager. Use a three‑period framework—loud, soft, intermediate—to label each jar, then blindfold or partially cover them for focused listening. Color‑code lids or bottoms so children can self‑correct without adult prompts. Adjust the pair count or substitute jars, eggs, and boxes to match age and attention span, ensuring sensory materials stay engaging.
- Change filler textures every month.
- Introduce new container shapes quarterly.
- Apply blindfold sessions for heightened auditory focus.
- Use color stickers for self‑correction and tracking progress.
Frequently Asked Questions
What Is the Alternative Name for Montessori Sound Cylinders?
You’ll hear they’re also called “Sound Boxes” or “Sound Cylinders (boxes),” terms teachers use interchangeably to describe the same auditory‑discrimination tools, whether sealed cylinders or box‑shaped containers.
How to Make a Sound Jar?
You’ll need a clean jar, lid, and filler like rice, beans, or marbles; seal the lid tightly, fill the jar to the desired level, then shake to test the sound before using it.
How to Make a Sound Box for Kids?
You’ll need a sturdy container, a lid, and filler like rice, beans, or sand. Seal it, shake to test volume, label each box, then let kids compare sounds and sort them by loudness.
What Are the Components of Sound Cylinders in Montessori?
You need paired containers, sealed lids, distinct fillers like beads, rice, or beans, a color‑coded or numbered labeling system, and a quiet workspace to let you focus on auditory discrimination.